Attributes and Elements in HTML
We are going to learn about the different attributes present in HTML.


Photo by Aaron Burden on Unsplash
HTML Attribute:
HTML attributes are special words that provide additional information about the elements; attributes are the modifiers of the HTML element.
Each element or tag can have attributes, which define the behavior of that element.
Attributes should always be applied with the start tag.
The attribute should always be applied with its keys and value pair.
The attribute keys and values are case-sensitive.
It is recommended to write HTML attributes in lowercase only.
You can add multiple attributes to one HTML element, but you need to give space between two attributes.
They provide additional information about the elements and enhance accessibility.
Attributes in HTML:
HTML <src> attribute:
HTML <style> attribute:
HTML <alt> attribute:
HTML <width> and <height> attributes:
HTML <id> attribute:
HTML <title> attribute:
HTML <href> attribute:
HTML <style> attribute:
HTML <lang> attribute:
Syntax to write attributes:
<element attribute_name="value">content</element>
Here in attribute_name, we will write the name of the attribute that we want to use in the code, and in value, we will write about the value, which can be the color or size of the text.
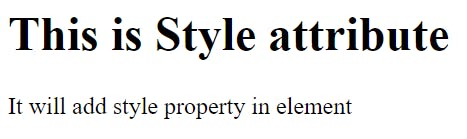
Style attribute:
It is the attribute which will help us style the text easily in different ways, i.e., we can change the color of the text, the size of the text, etc.
Now we are going to discuss some, which are as follows:
Height tag:
In this, we will change the height of the text that is to be presented on screen.
It is a part of inline styling.
It is part of inline styling.
EXAMPLE:
 <!DOCTYPE html>
<html>
<head>
</head>
<body>
    <h1> This is Style attribute</h1>
   <p style="height: 50px; color: blue">It will add style property in element</p>
</body>
</html>
OUTPUT:
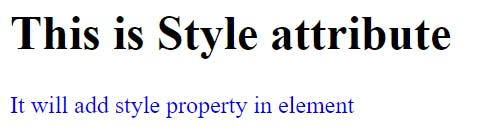
Color tag:
It is similar to the height tag, but we can change the color of the text by using this tag.
It is also a part of inline styling.
EXAMPLE:
<html>
<head>
</head>
<body>
    <h1> This is Style attribute</h1>
   <p style="color: blue">It will add style property in element</p>
</body>
</html>
OUTPUT:
Title attribute:
The value of the title attribute serves as the text that appears in the tooltip when a user hovers over the associated element.
We use it with any text or link to show the description of that link or text.
The title attribute can enhance accessibility by providing more information to users who may use assistive technologies.
EXAMPLE:
<html>
<head>
</head>
<body>
    <h1> This is Style attribute</h1>
   <p title="This is paragraph tag">Move the cursor over the heading and paragraph, and you will see a description as a tooltip</p>
</body>
</html>
OUTPUT:

HREF Attribute:
It is the attribute that is used to insert a link or to link one web page to another web page.
Used with an anchor tag that is represented by <a>.
- 💡The href attribute provides the hyperlink, and if it is blank, then it will remain on the same page.
EXAMPLE:
<html>
<head>
</head>
<body>
   <a href="">This is a link</a>
</body>
</html>
OUTPUT:

- It can also be used to display a YouTube video or a Google link.
Src Attribute
Used for the presentation of images.
This attribute can contain images in the same directory or another directory.
The image name or source should be correct; otherwise, the browser will not display the image.
EXAMPLE:
<html>
<head>
</head>
<body>
   <a href="https://www.bing.com/ck/a?!&&p=6c24ca85df7fcee8JmltdHM9MTcwNjkxODQwMCZpZ3VpZD0yZDg3MjFhZS1hNzVmLTZiYmMtMzIzNi0zMjI4YTYwMjZhYzQmaW5zaWQ9NTU5OQ&ptn=3&ver=2&hsh=3&fclid=2d8721ae-a75f-6bbc-3236-3228a6026ac4&u=a1L2ltYWdlcy9zZWFyY2g_cT1ibGFjayBqYWd1YXIgY2FyIGltYWdlcyZGT1JNPUlRRlJCQSZpZD1GQ0Q0OUU1RTY4Q0UyNjEzMUMwRjBGQUJCOUIwRkVDMkE1RTIxNTQ3&ntb=1">This is a link</a>
</body>
</html>
OUTPUT:
Alt Attribute:
This is an alternate tag that is used to show or display something if the primary attribute, i.e., the <img> tag, fails to display the value assigned to it.
This can also be used to describe the image to a developer who is actually sitting at the coding end.
It is easy for others to understand if their device or site has some issues.
EXAMPLE:
<html>
<head>
</head>
<body>
   <img src="" alt="Since the src value is blank,the alt value is displayed">
</body>
</html>
OUTPUT:

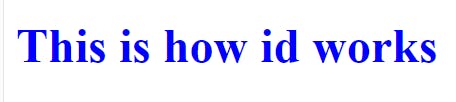
ID IN HTML
This tag is used to make the work easier.
Using this, we can make work simpler by styling it in the body, which could be used multiple times.
It is good because it is more feasible and easier to use when we require it.
EXAMPLE:
<html>
<head>
    <style>
    #hash {
        color: blue;
    }
    </style>
</head>
<body>
    <h1 id="hash">This is how id works</h1> </body>
</html>
OUTPUT:
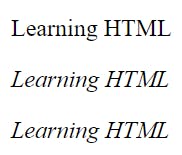
Lang attribute
The language is declared with the lang attribute.
Declaring a language can be important for accessibility applications and search engines.
EXAMPLE:
<html lang="en">

<head>
    <meta charset="UTF-8">
    <meta name="viewport"
          content="width=device-width, initial-scale=1.0">
    <title>lang attribute</title>
    <style>
        .lang-info {
            font-style: italic;
        }
    </style>
</head>

<body>
    <p lang="en">
        Learning HTML
    </p>

    <p lang="fr" class="lang-info">
        Learning HTML
    </p>

    <p lang="es" class="lang-info">
        Learning HTML
    </p>
</body>

</html>
OUTPUT: